I've recently acquired a surface pro 2. It's a decent device that's not too shabby. I really feel that the type cover is really better in terms of the feel then the surface pro 3 type cover.
However after upgrading to windows 10. the first few things which are missing after the upgrade is the pen function and the closing the type cover lid to sleep the device.
If you're having the above problems. You're not alone.
If you're left without pen access: Solution is to download the Wacom driver. I've tried a few but seems like only this driver worked. http://cdn.wacom.com/U/drivers/TabletPC/ISD_DualTouch_712-9/ISD_DualTouch_712-9.exe
For the Lid close to sleep issue, I'm still figuring out will update when I find the solution.
Tuesday, 5 January 2016
Sunday, 15 November 2015
Lenovo X230 Hackintosh
To keep things simple, here's what you'll need.
- USB Stick (8GB or more)
- Download MacPwn EL Capitan (http://www.hackintosh.zone/downloads/download/890-macpwn-el-capitan/)
- Download EL Capitan from APP Store
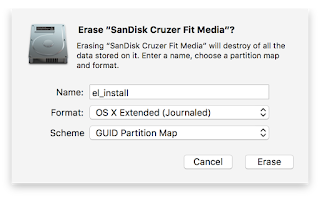
- Format the USB Stick to this specs
- Run the MacPwn El Capitan App
- Make sure you install it on the "el_install" usb drive
- Wait .... (takes around 15-20mins)
- Download Clover for El Capitan (http://www.insanelymac.com/forum/topic/307003-clover-os-x-el-capitan-usb/)
- Copy the Clover OSX El Capitan v6.app to the USB (you'll need this to make your HDD bootable once installed)
- Download EFI Mounter v3 (http://www.tonymacx86.com/downloads.php?do=cat&id=10)
- Copy the EFI Mounter v3 to the USB drive too, (you'll need this to mount the EFI partition on your newly installed OSX on the HDD)
- Download the KEXTS, Go to https://github.com/RehabMan and go ahead to download these
- OS-X-Voodoo-PS2-Controller
- OS-X-FakeSMC-koziek
- OS-X-ACPI-Battery-Driver
- Copy all these to the USB Drive (unzip all these to the folder called kext)
- Now on the X230, ensure your BIOS settings for CSM = disabled, boot from UEFI
- Now boot from the USB
- It's perfectly fine if your keyboard don't work, just use external USB KEYBOARD/MOUSE for it first
- Once the installation is done, keep the USB in to boot
- Once booted into OSX
- Run the Clover El Capitan v6.app choose post installation, and customise the installation to include boot loader "Clover V2.3K r3292 UEFI
- remember to install it on to the HDD
- Use EFI Mounter to mount the EFI drive
- Copy all the KEXT to the /EFI/CLOVER/kext
- edit the config.plist
- look for <key>Graphics</key>
- after the first </dict> add in this lines
<key>ig-platform-id</key>
<string>0x01660003</string> - reboot with the USB drive removed. You're done.

What's not working
- WIFI
- and some usual stuffs
Sunday, 1 November 2015
BRAINSTORM: Building an in-expensive Digital Media Advertisement Solution
Pre-requisits:
- 1080p HDMI-TV
- A Good Cheap WIFI capable Android Mini-PC, those from Allwinner or Rockchip will do the trick, but i did mine on an Intel Compute Stick and the Nvidia TK1 which is good enough to display 1080p.
- A Internet Host, maybe Digital Ocean's $5 a month 1Core, 512MB, 20GB HDD Ubuntu Server
- Python running Tornado
- API to get a playlist
- Websocket for push so we can send commands to the device
- Dashboard so we can get those realtime analytics
- CMS for maybe advertisers or content owners to slot in their videos/still images - Rethink.DB to update our RealTime Dashboard
- Normally i will recommend a HYBRID app on this but rule of thumb for me if you're to use webview, make sure they are only simple and minimal css, else it'll screw up everything. So I think i'll stick with NATIVE on this.
The Solution:
- Android App that will first login using their device-id which is registered with the server, this is to identify the device's location and what kind of content we could display on it, we don't want M18 content to be delivered to PG locations wouldn't we...
- Once connection is established with the server and device identified, the correct playlist will be sent to the device for parsing
- The Device will store the parsed playlist (json format), store it on a sqlite database for easier retrieval.
- The Device then will execute the first item on the playlist in-which it will check if the content is available locally, if it does then display it else it will initiate a background download and move on to the next item in the playlist, if the next item is also not available locally, it will then schedule download for this item and this loops goes on till the end of the list. While waiting for download, it will display a default image or animation with the progressbar for each of the content download. As soon as the first content is completely downloaded it will playback that content.
- At any given time if the device receive a websocket request, it will check for try to decode it using the PSK that it's embedded with if the decode is good, then it will execute the command, there are 3 types of commands:-
- background task (executes after download and current item is playist has played)
- foreground task (happens immediately, regardless of content status)
- scheduled task (happens immediately if the schedule time has reached) - The media display will have 6 display elements:-
- Title / Text (Size)
- content 1 / image (url/duration) ,text (size), video (url/start/end)
- content 2 / image (url/duration) ,text (size), video (url/start/end)
- content 3 / image (url/duration) ,text (size), video (url/start/end)
- Background Image for Title
- Font (ttf only) - After each playback the app will thru websocket send a play done with their device-id which the server will write into Rethink.db which will have an event to update the realtime dashboard in which the content owner can monitor.
- Next is the content owners CMS which enables them to create playlist based on a grouping of device-id. Upload of Images/videos and such can be stored to the server or thru certain APIs to dropbox or some other online storage services (google drive, skydrive, etc...) just make sure it's publicly available so that the android boxes can download them later.
Friday, 30 October 2015
Android on Intel's Compute Stick (STCK1A32WFC)

Intel STCK1A32WFC
This product comes with windows 8, and is fully capable of running ubuntu and android directly. To make this work, you'll first need to prepare an USB drive with the necessary OS that you would like, Ubuntu or Android x86.
The easy part.
Put a bootable USB stick with the os into a USB hub connected to the device, and press F10 upon the boot process to select to boot from the USB.
Note: I tested with Ubuntu 14.04 and also the android 4.4.2-r1-ia2 (kitkat-IA) from https://01.org/android-ia/downloads.
How to prepare the USB.
Linux:
use unetbootin
Windows:
Use rufus
OSX:
open terminal and type the commands below
sudo su <-this is to grant you superuser access
diskutil list <- this to find out which drive number your usb is assigned.
the find out which disk is your usb should be like /dev/disk2 or something... please make sure else you'll be wiping the wrong disk and may cause issues with your system.
dd if=live.img of=/dev/rdisk2 <-this will write the image to the USB
wait... till it finishes.
Side note
I've also tested to boot via http://android-x86.org - android x86 lollipop livecd, it can boot but however after installation it seem to fail to boot, i'll check on this and revert if i have any new findings on how to get it to work. My suspect is the Intel hd graphics.
Subscribe to:
Posts (Atom)